Table of Contents
- Part 1: Retopology - Domo Arigato Auto-retopo (setting up your meshes and using ZBrush for auto-retopology)
- Part 2: Retopology - The Numbers Game (Using Quad Draw to make manual tweaks)
- Part 3: Retopology - The Moment of Truth (Transferring Attributes and sewing your garment back together )
- Part 4: UVing
- Part 5: Pockets, Seams and Buttons
UV-ing
Okay, here comes the fun part. By now your garment has undergone a complete re-topology, with clean edge loops and welded (merged) vertices. Everything lines up perfectly, and if you were diligent at the beginning with your counting, you will have arrived at this stage relatively quickly. If you weren't, well you likely suffered through the process and had to give the transference of attributes a few frustrating tries. The more complex your sewing scheme, the greater the puzzle, so unless you are answering to a rather demanding client or superior at work, I highly recommend asking yourself the following BEFORE embarking this journey: "what can I do to simplify this process without compromising on the finished work?" At some point the effort is no longer worth the agony and time. In this case, the project required that the pockets be usable as Ncloths, so extruding fake pockets was not an option. Furthermore, the giant patch at the back of the jacket was deemed iconic to its owner; it was large enough and important enough, so we kept it. That said, I removed the patchwork letters, "R R", with plans to add them in later using displacement maps and texturing. At that level of detail, the headache wasn't worth the effort and the team agreed I could forgo the meshed letters. In the absence of the letters however, you can still see their indentations from the sewn tension lines, thanks to the work done in Marvelous Designer as well as the transference of attributes we did earlier.
UV-ing thickness
Since Marvelous Designer is just not quite there yet in retopology, We need to UV the thickness of the clothing manually. You COULD export a thick version of your clothing mesh, cross your fingers and toes and Zremesh it in Zbrush hoping something reasonable turns out. And I suppose for very basic clothing this could work. Call me a QUAD-SNOB but personally I find that option of theirs ineffective in this scenario as the results are less than stellar on anything beyond a simple shirt. Luckily there are some tools available in Maya to quicken and simplify the process. I used the Planar Projection Method, by selecting all faces pertaining to the jacket's thickness (1), Projecting (2) and Unitizing (3) them. There. No fuss, and no finger crossing, nail biting, quantum leaping results.
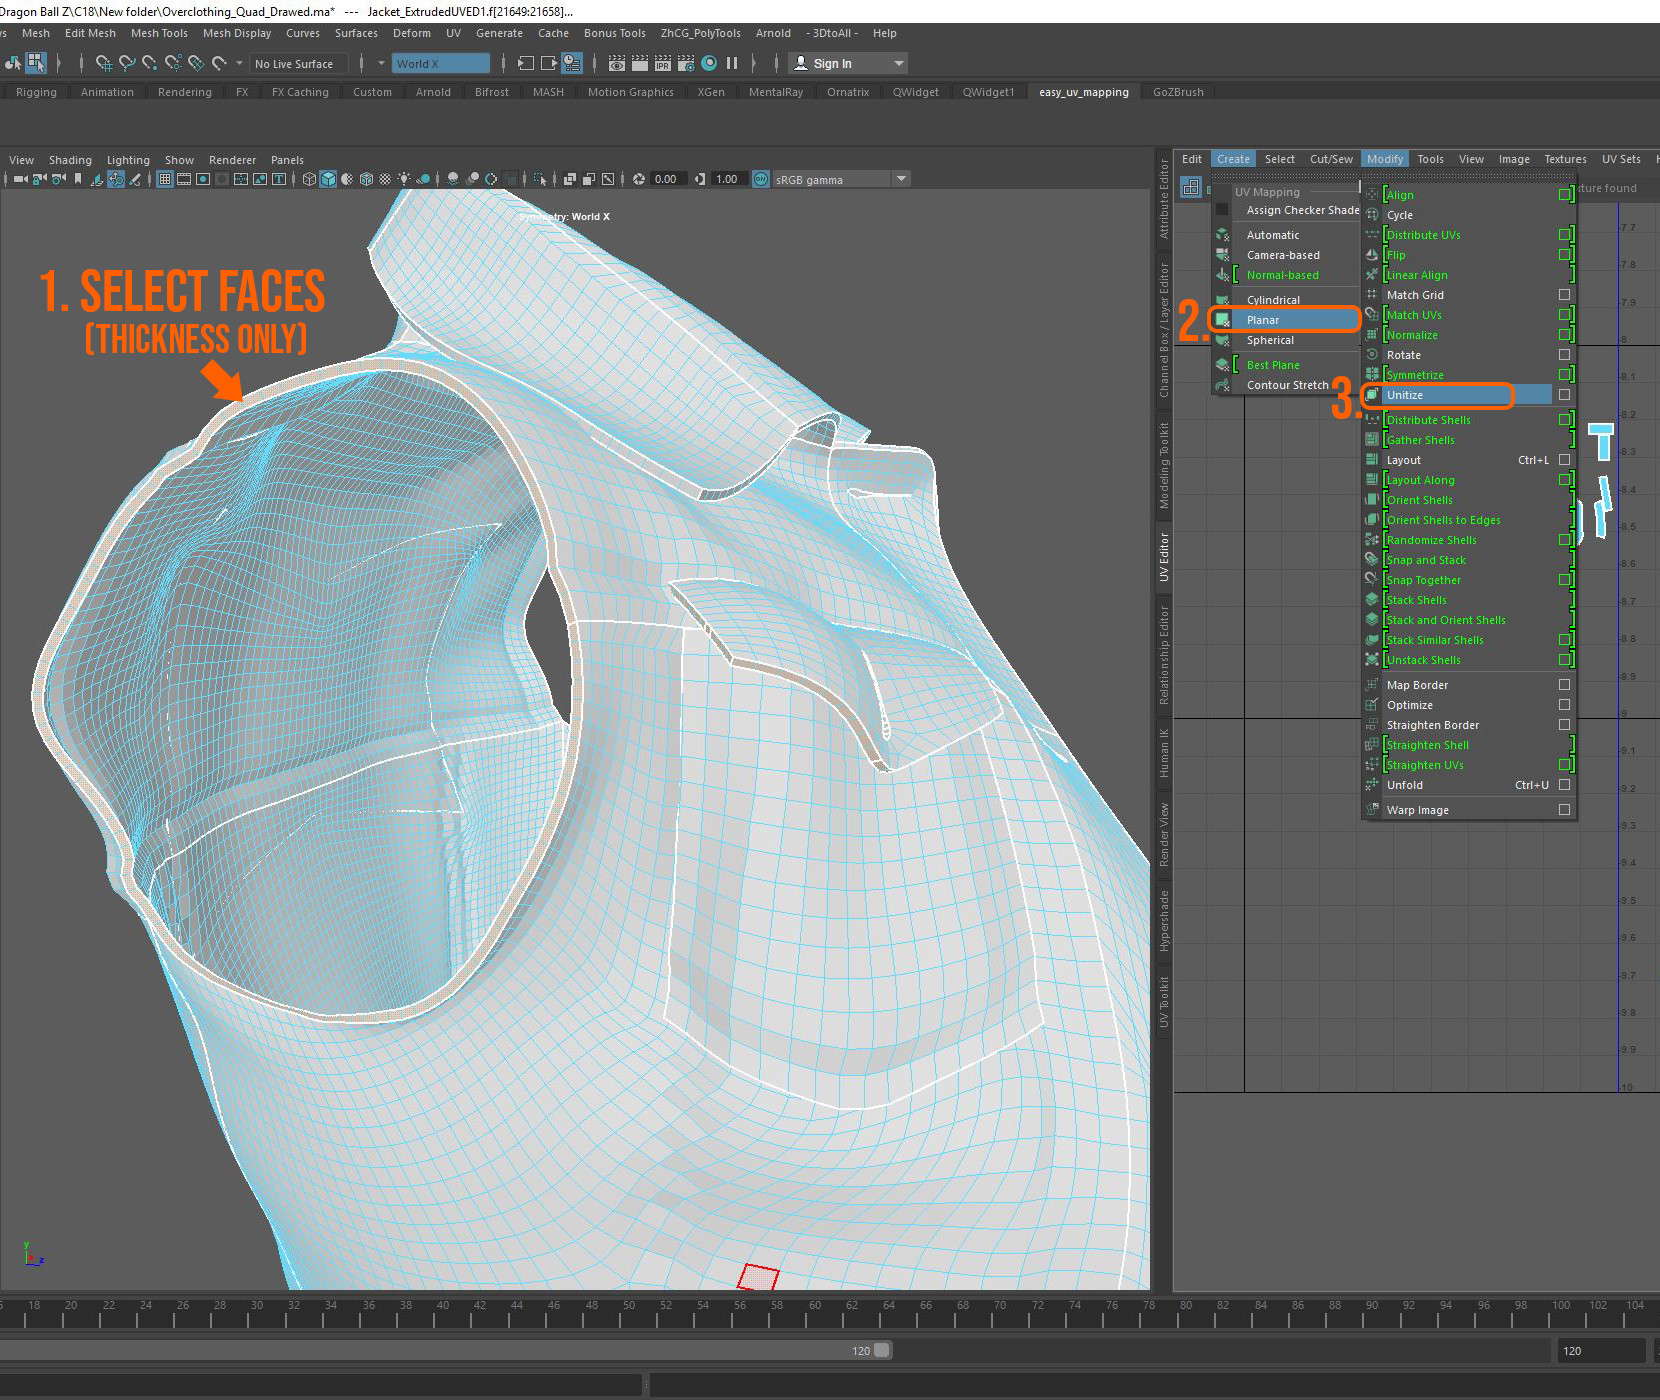
Unitizing the faces will create perfect squares, meaning every face is now the exact same size and its own UV shell, which makes it much easier to create clean strips. To sew the UV shells into strips, select all edges along the thickness (excluding corners and where the main UV shells intersect) (1) and Cut/Sew > Move and Sew them together (2). Excluding the corners and main UV shell intersections is a very important step in this process as it determines the beginning and the end of each strip, lining them up with the current UV shells created in Marvelous Designer. This will become paramount later on, especially if you want to get that obsessively "seamless" natural look at the texturing stage.
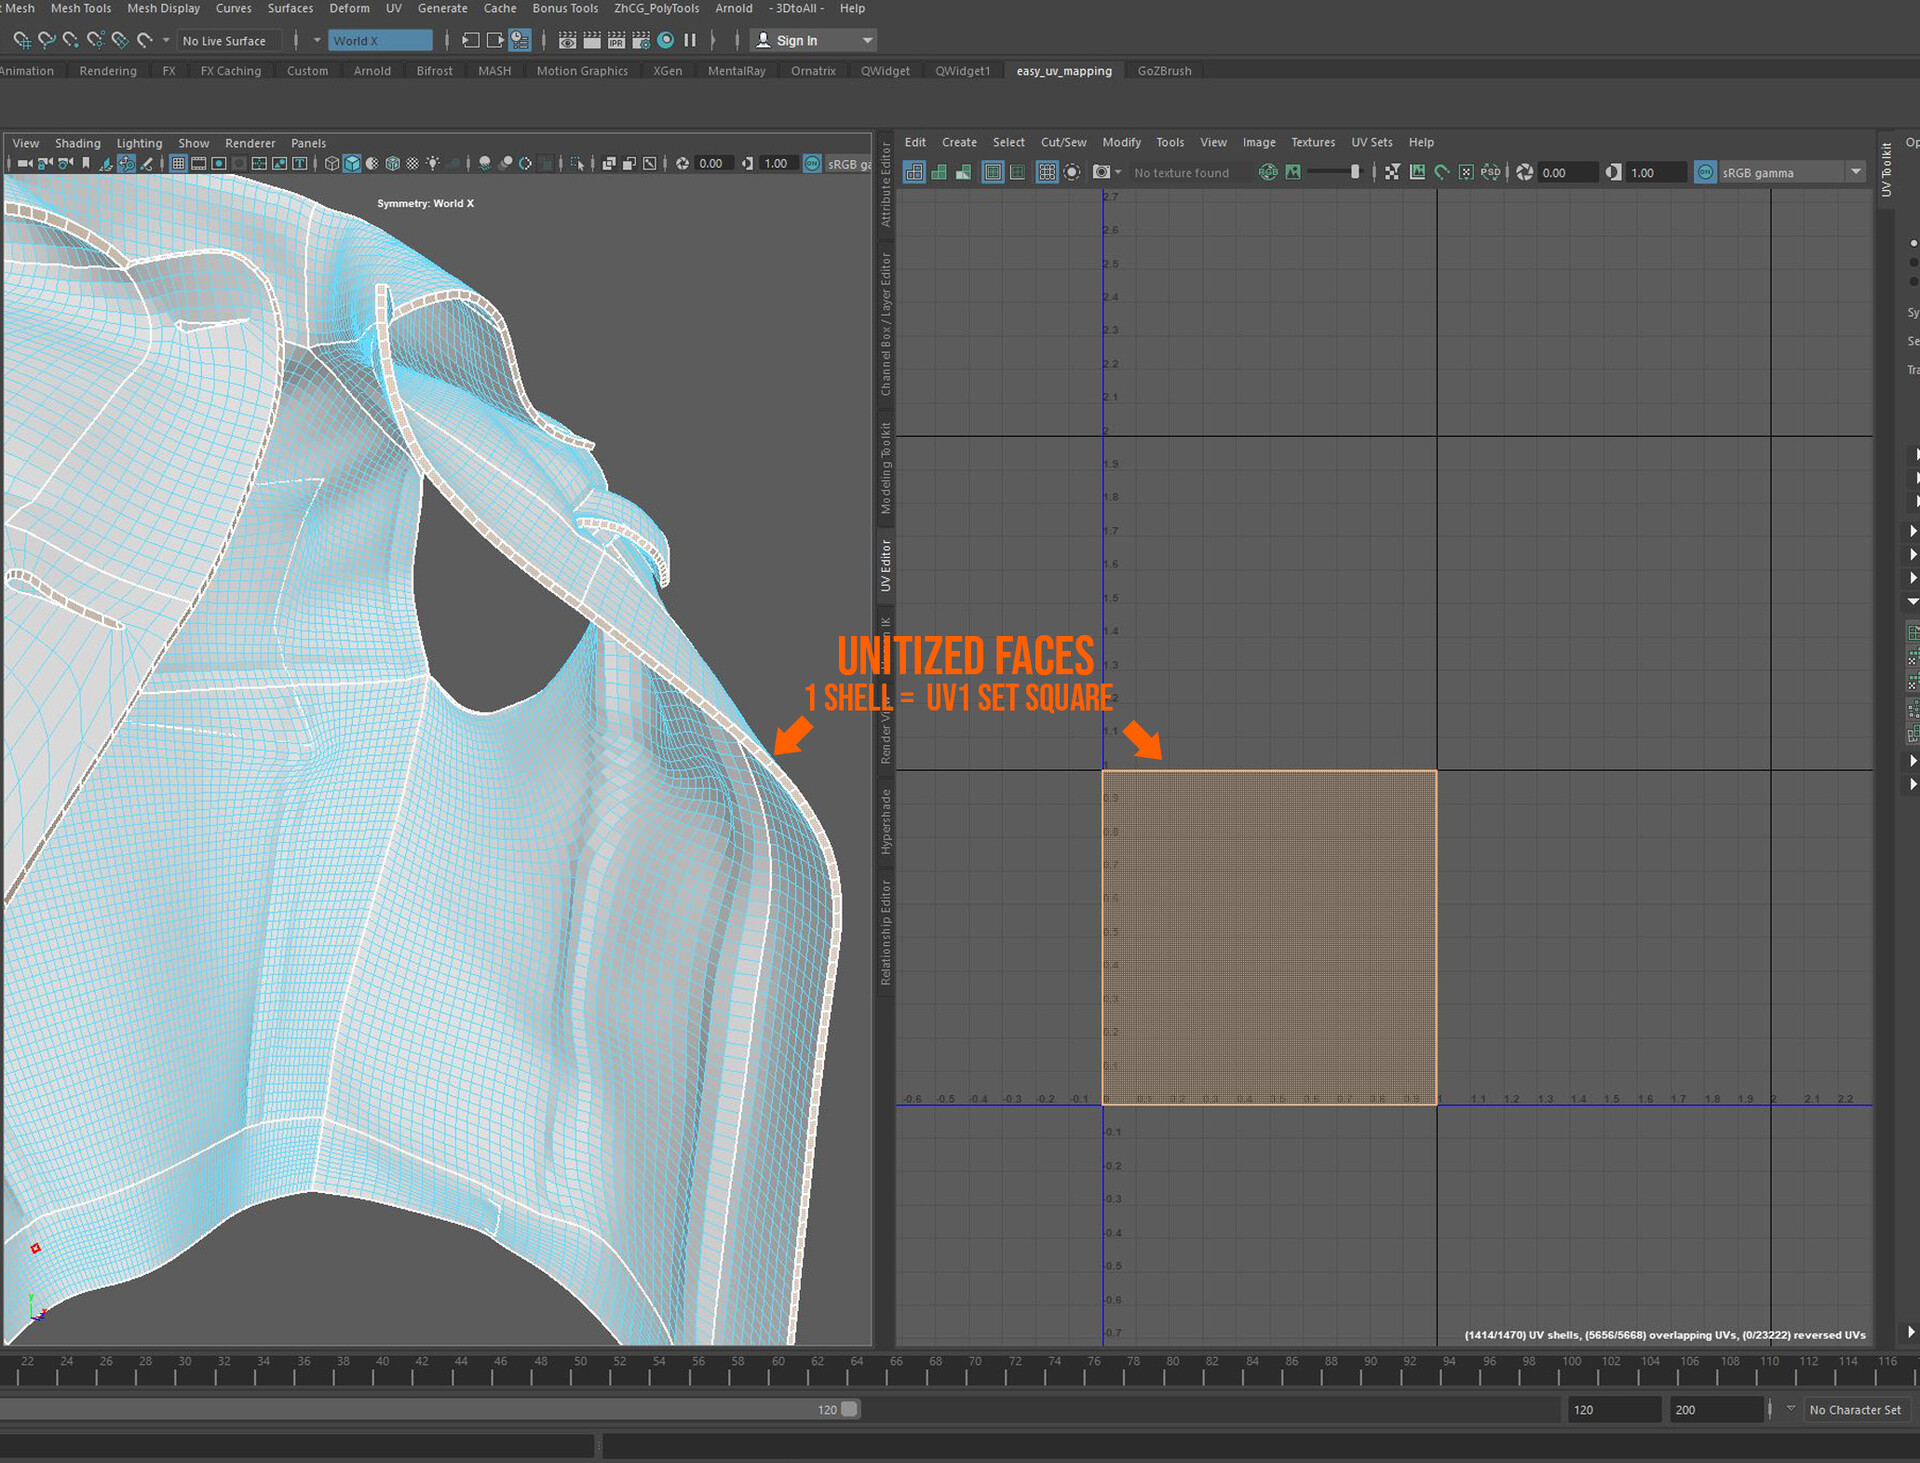


TIP: Projecting, Unitizing and Sewing ALL of the strips in one fell swoop will save you a lot of hassle. You will spend a lot less time pressing menu buttons and commands, not to mention the immense satisfaction you get from seeing it all manifest in 3 simple mouse clicks! Aww yisss!
At this point all of your thickness strips are laid out. Now we need to integrate them with the other UV shells. The first step is entirely optional(1). I left my strips horizontal because they laid out that way (other advantage of laying out UVs using a single command). Secondly you want to Unfold the strips. Select all strip faces, in the UV toolkit > Modify > Layout □ . Unfold along U or V (U = horizontal ; V = vertical) (2). You can then Straighten the UV strips (3) if you are persnickety like me.

Now lets fit all of the shells together into one nice UV set. For those of you stepping ahead and thinking about creating two UV sets (inside and outside fabrics for instance) hang on! There are a few adjustments that you might want to make beforehand, especially for clothing such the vest in this example, which has a very visible inside and outside.
The first thing you want to do is flip any reversed UV shells. Save yourself the hassle and check the box in the Legacy version of the Layout Menu (Select all faces > Modify > Unfold □ ). For some reason the Unfold3D method (which is stellar btw) doesn't have this feature, so you'll have to layout twice. Luckily for you, its just a few clicks and checking off a few options before hitting Apply. If you skip the first step, you will be stuck with UV shells that texture and paint backwards to the way you physically see the 3D version of your mesh, which is a total mind-scrunch! This is a tip I learned from Olivier Couston, and I am forever grateful for his input!

But What About Pockets?!
If you haven't noticed by now, the pockets, patches, and any miscellaneous straps are not welded to the vest. This means that the moment you make the clothing dynamic, they will simply fall off and succumb to the calculated forces of gravity during a Maya simulation; which is bad.
Part 5 explores how to weld Patches, Straps and Pockets to your garment without problematic non-manifold geometry.
Go to Part 5: Pockets, Seams and Buttons >